There are a
shit-ton of armies to chose from in Warhammer.
I quickly narrowed my choices to Dwarfs, Lizardmen, Ogre Kingdoms, Orcs & Goblins, and Tomb Kings based on aesthetics, basic fluff, and D&D. It came down to the playstyle I believed that I saw in the LM list.
So I began...

After a little shopping, and a very generous donation from a friend who never finished putting together his Lézards, I have a lot to work with. Two Saurus Warrior Regiments, two Skink Regiments, 32 Skinks with bows from an older edition, eight Cold One Cavalry (that need a lot of work/glue removal), and a metal Saurus Oldblood/Scar-Veteran with his shield arm missing.

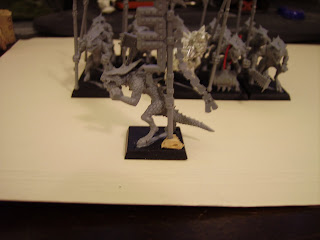
My early stages of construction. I am very happy with the kits; plenty of variety, plenty of extra bits. There was an immediate downside to my choice of Lizardmen: mold lines. All miniatures have em, metal and plastic. LM are VERY spiky and scaly however, and this means lots of crevasses. I don't know if I'd let mold lines/smooth surfaces (or lack thereof) determine my army choice, but it might for my next.


I'm going to do all of my shields separately to make life easier on myself (painting Space Marine bolters still makes me angry).
I knew right away I wanted removable standards and musician instruments so I could use the Saurus without upgrades. Here is what I came up with:
The support for the standard is a little bit of cork (Chris' great suggestion). I cut off a bit I liked the look of and drilled a hole with a pin vise, and widened that with a cylindrical file. When the standard pole fit (without the cork breaking) I super glued that to the base of the already assembled mini. The hole provides you with a guide for drilling through the base; you can widen that with a file too, and then the pole should fit all the way through and have enough support to stand. When primed and painted the cork should look like a nice rock or two that the Saurus planted the standard in.
I really like the idea I had for the musician's drum:

The red string is a placeholder as I work out a thinner, broad strap that looks right. Doesn't he look happy? It's cos he can put the damn thing down once in a while.


I chopped off the bulky Saurus arm that was hugging the drum and then shaved off the sides till it smoothed out. I was either going to use the shoulder or the bracelet as a way to hold a strap I'm working on, but the wrist/bracelet doesn't survive the process as intact as the shoulder. I also wanted to ensure however I chose to attach a strap could easily be redone with thread in the future after painting.
To date I have assembled one of the Saurus kits, one of the newer Skinks, the 32 Skink archers (cos they just needed to be put in to a base :P), and ol' one arm (Saurus Oldblood/Scar-Vet), and that's just about what I need to field my first 500 pt. army.
Looking over my past works with 40k (my Dark Angels, Eldar, Necrons, Tyranids) I'm really trying to step up my effort; removing all mold lines, using as little glue on each bit as possible, going over each step a few times in my mind, and reading up on other peoples' work/tips. I have a lot of unassembled 'Nids and I'm going to use them to practice my painting.


 Materials: Cereal box cardboard, coffee stirrer sticks, black spraypaint.
 It's pretty straightforward to measure things out with the bases you intend to use them for. I used a straight edge to make some marks in pencil, eyeballed most of the cutting. The Saurus fit so perfectly it makes me wonder where I went wrong with the Skinks, they are a little loose.
 My early stages of construction. I am very happy with the kits; plenty of variety, plenty of extra bits. There was an immediate downside to my choice of Lizardmen: mold lines. All miniatures have em, metal and plastic. LM are VERY spiky and scaly however, and this means lots of crevasses. I don't know if I'd let mold lines/smooth surfaces (or lack thereof) determine my army choice, but it might for my next.
 I'm going to do all of my shields separately to make life easier on myself (painting Space Marine bolters still makes me angry).
 The red string is a placeholder as I work out a thinner, broad strap that looks right. Doesn't he look happy? It's cos he can put the damn thing down once in a while.
 I chopped off the bulky Saurus arm that was hugging the drum and then shaved off the sides till it smoothed out. I was either going to use the shoulder or the bracelet as a way to hold a strap I'm working on, but the wrist/bracelet doesn't survive the process as intact as the shoulder. I also wanted to ensure however I chose to attach a strap could easily be redone with thread in the future after painting.